REVIEW · YOGYAKARTA
Yogyakarta: Silver Jewerly Traditional Making Workshop
Book on GetYourGuide →Operated by YKExplore · Bookable on GetYourGuide
Silver jewelry starts as plain metal. In Kotagede, this hands-on Yogyakarta workshop turns that metal into your own design, taught step-by-step by local makers. What I like most is the English-speaking guidance and the clear build-up from choosing a motif to doing the real work with tools like soldering and engraving. The other big win: you leave with a finished keepsake (and a course certificate). The main drawback to consider is time. In a 2-hour class, you may not finish every detail yourself, depending on how complex your design is.
I also like that the workshop doesn’t just hand you a gadget and send you off. You get a short tour of how the shop works, and you can watch what’s happening in the background while you’re learning. Plus, the kit covers the essentials: silver, tools, safety guidance, snacks, and mineral water. The pacing is friendly, but it’s still tool-based work, so follow the safety briefing closely and wear comfortable shoes and clothes.
In This Review
- Key things you’ll notice in this Yogyakarta workshop
- Kotagede workshop basics: where you start and what you get
- The 2-hour flow: from motif picking to taking home a finished piece
- Traditional techniques you’ll actually learn (not just hear about)
- English guidance and the value of watching the pros
- Safety and pace: sharp tools, no shortcuts, and why 2 hours can feel tight
- What you take home: masterpiece, certificate, and the memory in the metal
- Cost check: why $33 can be good value for a silver workshop
- Who should book this Yogyakarta silver jewelry workshop?
- Should you book this Yogyakarta silver workshop?
- FAQ
- How long is the Yogyakarta silver jewelry making workshop?
- What does the price include?
- Is the workshop taught in English?
- Where is the meeting point?
- Do I need to bring tools or silver?
- What should I wear?
- Is it wheelchair accessible, and is it suitable for mobility impairments?
- Are there any rules about fire or explosives?
Key things you’ll notice in this Yogyakarta workshop

- English instruction throughout so you’re not stuck guessing what the silversmith wants you to do
- Real workflow, not just a demo, including a look at how the shop finishes pieces
- Choose your own motif such as earrings, rings, or pendants (options can be simple and beginner-friendly)
- Tool + material support included, including silver, so you’re not paying extra for basics
- Snacks mid-session with mineral water, which makes the 2-hour format feel more humane
- Time limits are real, so if you want every step done by hand, plan for that up front
Kotagede workshop basics: where you start and what you get
This Yogyakarta silver jewelry workshop takes place in Kotagede, one of the better-known areas for metalwork in the city. The meeting point is at Jl. Mondorakan No.1, Prenggan, Kec. Kotagede, Kota Yogyakarta (Daerah Istimewa Yogyakarta 55172). It’s a good spot for doing something creative without needing a half-day trek across Java.
The class is priced at $33 per person and lasts about 2 hours. For that time, you’re not paying just for instruction—you also get materials and tools, plus a few extras that make the experience feel complete. What’s included is clear: silver, tools, mineral water, a snack, your own finished piece, and a course certificate.
The practical part matters. You’re required to bring comfortable shoes and comfortable clothes. Expect tool-based work, including the kind of instruments used for shaping and detailing. If you’re coming from sightseeing all day, give your feet a break and wear something you can stand in.
Also note the access info carefully. The venue is listed as wheelchair accessible, but the activity is also listed as not suitable for people with mobility impairments. That usually means the space might work, but the actual making process (standing, tool handling, and close attention) may not.
You can also read our reviews of more tours and experiences in Yogyakarta


The 2-hour flow: from motif picking to taking home a finished piece
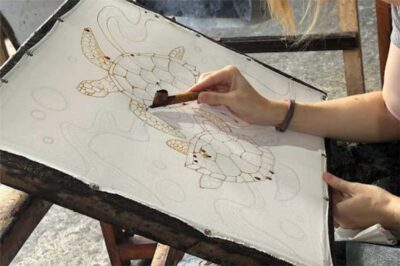
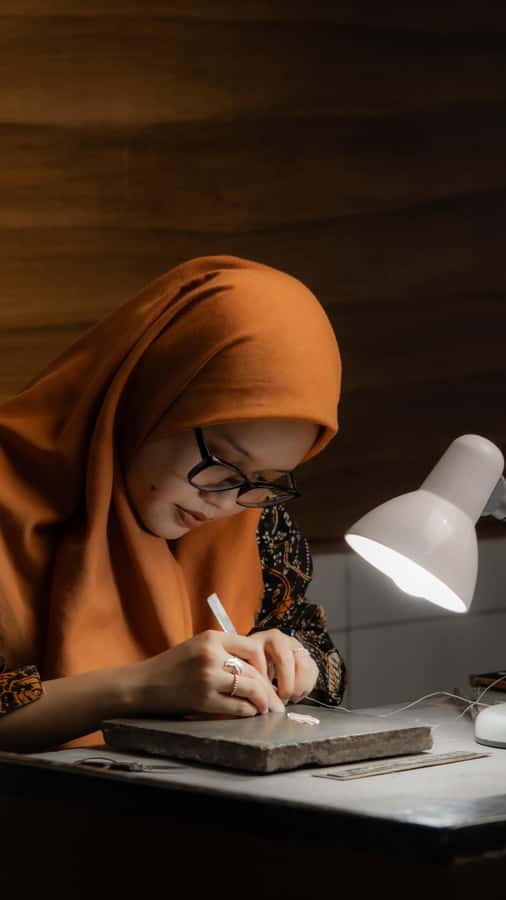
The workshop is built as a step-by-step loop. You’ll start with an explanation of the tools and safety rules, then you’ll move into choosing what you’ll make. The goal is simple: you craft a silver jewelry piece you can take home, even if you’re a first-timer.
Step one: a shop look and a process tour.
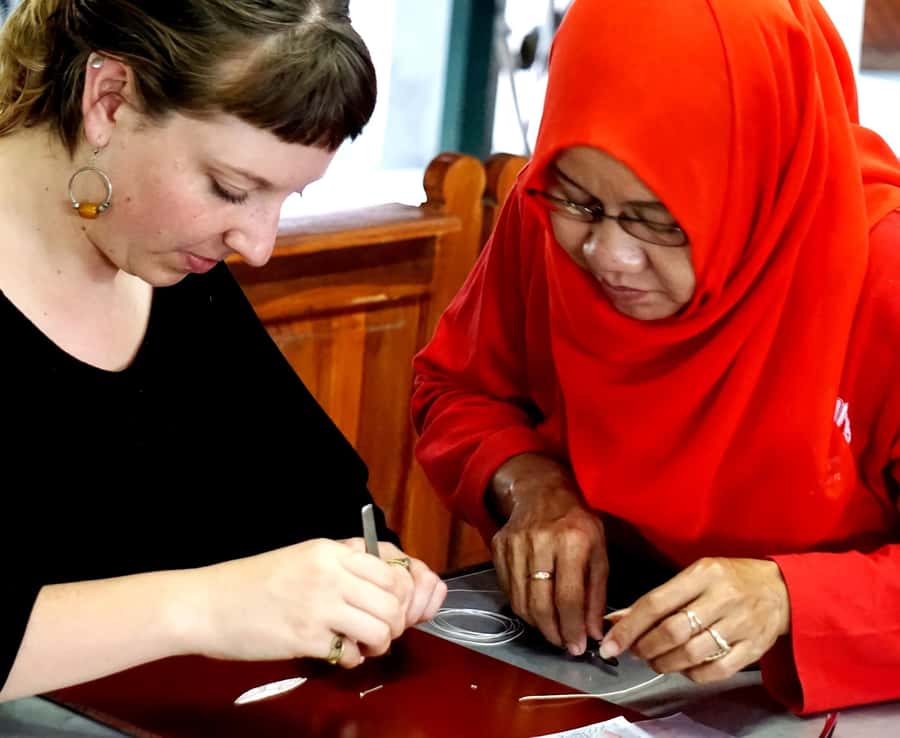
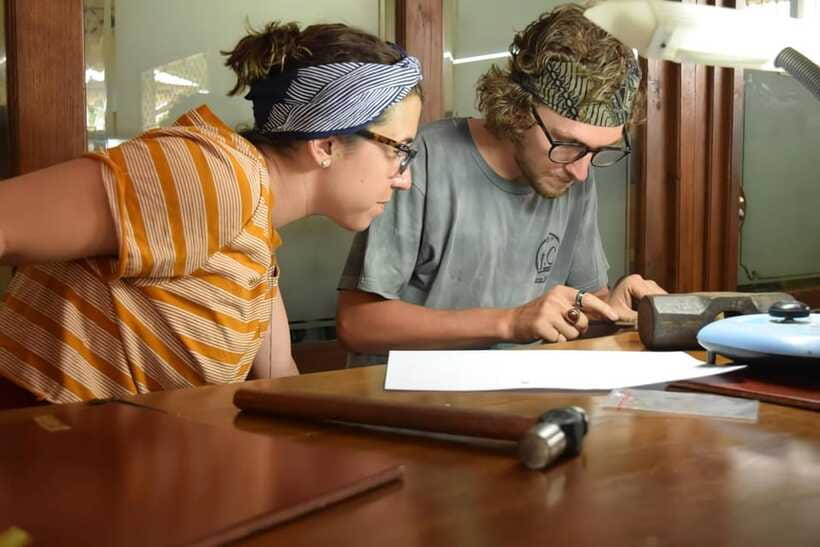
Before you do your own piece, you’ll get guidance on how the silver-making process works. You may also be able to watch workers as they handle parts of production. That matters because you’re learning in context. You see that jewelry making isn’t a single move—it’s a chain of actions, and each step has a reason.
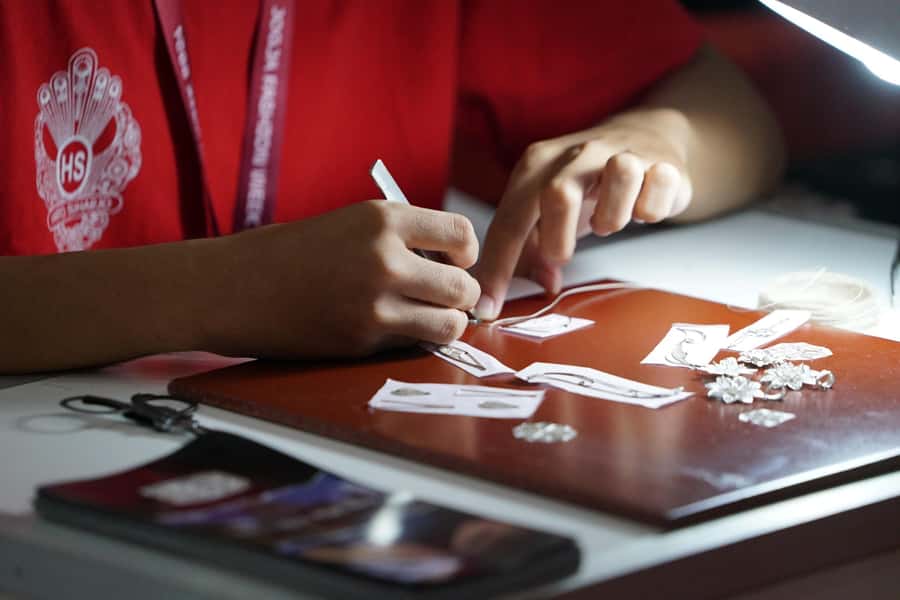
Step two: picking your design.
You’ll choose a design based on available motives. One common setup includes simpler options like earrings, rings, and pendants, which are easier to manage within a two-hour session. If you want something very intricate, keep in mind you might not have time to finish every tiny detail yourself.
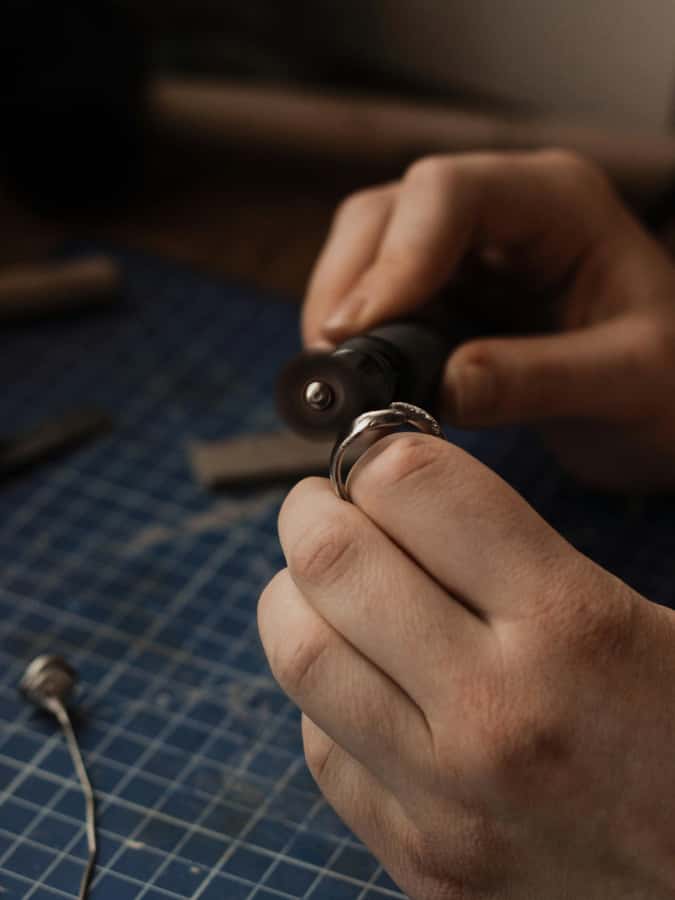
Step three: the hands-on building work.
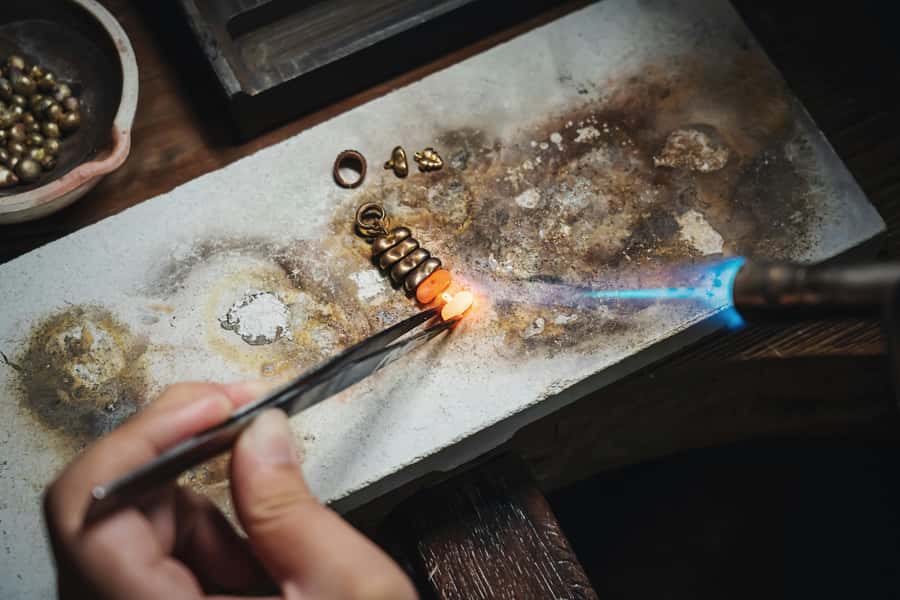
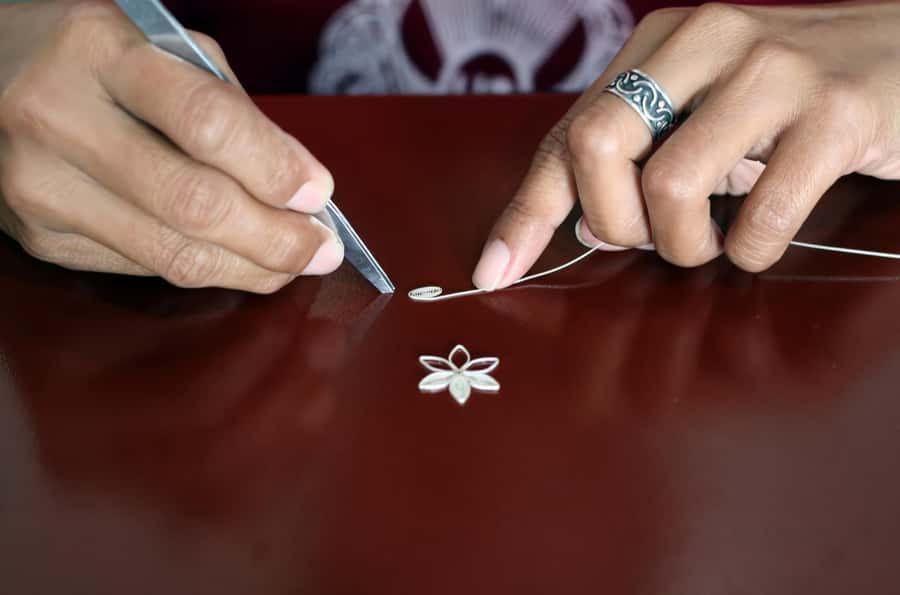
You’ll learn and practice the core actions, typically including:
- Soldering (fusing pieces of silver safely)
- Shaping (molding or forming the base)
- Engraving and detailing (adding patterns or textures)
This is where English instruction helps. If you understand what each tool is doing and why, your hands follow better. You’re not just copying motions—you’re learning the logic of the craft.
Step four: timing, support, and finishing.
Because the class is only 2 hours, the pace can get intense. In at least one case, the workshop team helped if the participant didn’t finish their work in time. That means you’re still likely to leave with a polished result. You might also get to watch later production steps from the workshop side, such as transitions from heating/burning processes to polishing-style finishing (depending on what’s happening that day).
Step five: snack and wrap-up.
Mineral water and a snack are included. One schedule detail from a past participant: snack bags came after about one hour. That gives a mental reset right when you start feeling the effort.
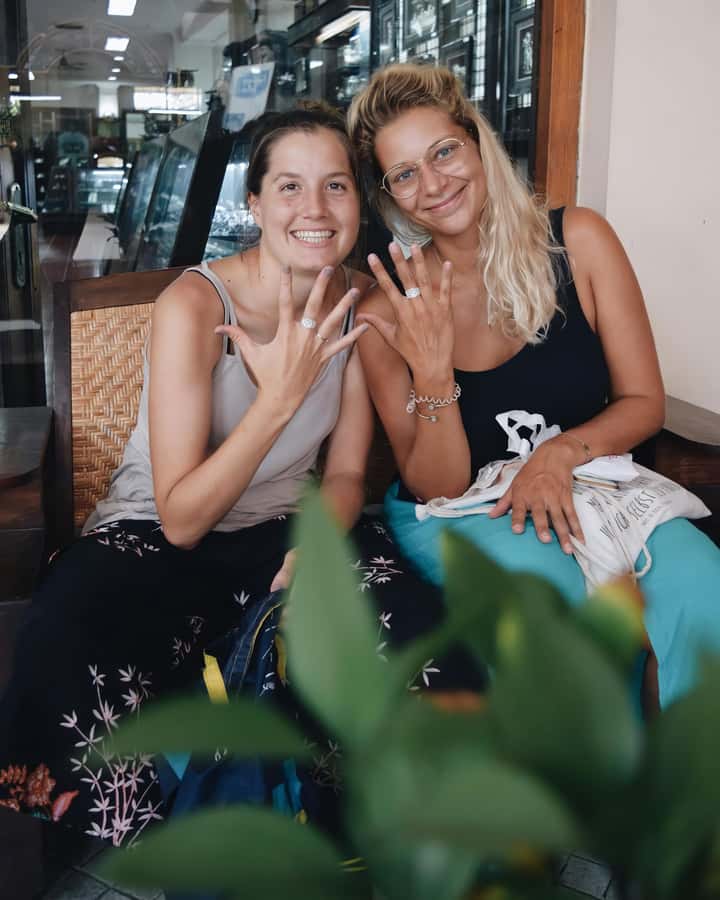
Finally, you take home your masterpiece and receive a silver course certificate. The certificate is small, but it adds weight to the souvenir. You’re not just buying a made-by-someone-else item. You made it, and you can remember the specific workshop experience that produced it.
Traditional techniques you’ll actually learn (not just hear about)
Silver jewelry has a “feel” to it. The weight, the resistance of the metal, and how patterns show up after finishing are part of why people get hooked on craft. In this workshop, you’re taught the traditional steps, with enough structure that you can follow along even if you’ve never held a silversmith’s tool before.
Here’s what those methods mean in plain terms for your experience:
Soldering: learning what safely fusing metal really involves
Soldering is one of the first intimidating steps for beginners because it includes tools and careful handling. In the workshop, it’s taught as a basic technique: safely fuse pieces of silver so your design stays together. The fact that the class provides materials and guidance helps reduce the learning curve.
Shaping: turning flat or basic pieces into a jewelry form
Shaping can sound vague, but in practice it’s where your piece starts to look like something you can wear. You use tools to mold the silver into your desired form, under guidance. Even if the final outcome is partly supported by the workshop in tight timelines, you still do the shaping work that gives your piece its personality.
Engraving and detailing: making your design personal
Engraving is where you can add patterns or textures. This is often the part that feels fun, because you can reflect your taste. If your motif is simple, you might enjoy how quickly you see results. If you pick something more demanding, focus on finishing the work you can complete neatly within the session.
Throughout the process, the workshop is framed as traditional silver-making—hand methods, attention to detail, and a respect for techniques passed down through generations. Even if you’re only learning one part of the chain, you walk away knowing how the craft moves from raw material to something wearable.
English guidance and the value of watching the pros
This activity is listed with an English instructor, and that’s a big deal for a skill-based workshop. You’re using sharp tools and doing precise steps. When you understand instructions clearly, you spend less energy on translation and more on doing the task right.
One highlight from a previous participant’s experience is that the workshop leader provided a tour and walked them through steps at the start. The same participant also mentioned that the leader stayed close while they worked, offering help when the process got harder than expected. That matches what you should expect from a good craft class: coaching in the moments that matter, not just a lecture at the beginning.
Another helpful element is the shop perspective. You may get to watch workers handling parts of production while you’re learning your own portion. This matters because it shows you how professional finishing works—how pieces move from making to cleanup and final polish.
If you’re the type who likes context, the watching component adds a lot. It also helps you handle the “two hours” reality. Even if you can’t finish every micro-step yourself, you understand what still needs to happen for a finished look.
Safety and pace: sharp tools, no shortcuts, and why 2 hours can feel tight
This workshop emphasizes safety because you’ll be working with sharp tools and metalworking equipment. The guidance is explicit: tools like soldering irons, engraving tools, and cutting instruments are sharp. You’ll get a comprehensive safety briefing and demonstrations on how to use each tool properly, and you must follow the instructor’s guidance at all times.
There are also clear restrictions on behavior. Fireworks, explosive substances, and making fire aren’t allowed. That’s the operator setting boundaries so the workshop stays safe for everyone involved.
So what should you do as a participant? Practical steps:
- Wear comfortable shoes and clothes that won’t feel awkward around tools
- Listen carefully during the safety briefing; it’s not filler
- Keep your attention on the tool in front of you, not your phone
The other “safety” issue is timing. Two hours sounds long until you realize it includes instruction, safety, your own practice, and finishing. If you want to be deeply hands-on for every step, you might feel rushed. One participant experience flagged that there should be more time for handcrafting yourself, which is a fair consideration.
A smart strategy is to choose a motif that matches your patience. If you’re a total beginner, simpler earrings or a small pendant form can be a better fit than a design that depends on tiny engraving details. You’ll still end up with something meaningful, and you’ll reduce the chance you feel like you didn’t get to fully shape the piece with your own hands.


What you take home: masterpiece, certificate, and the memory in the metal
The “take-home” part is the reason this type of workshop works as a travel experience. You don’t just learn a skill—you create an object you can keep. In this case, you leave with your own silver jewelry piece plus a silver course certificate.
That certificate is small, but it changes how you remember the activity. Instead of a generic souvenir, you get a proof of the workshop you attended. It’s also a good fit if you want to share the story later: you can tell people you did a traditional silver-making course in Yogyakarta, using the tools and guided steps included in the workshop.
One subtle detail that you’ll appreciate if you like behind-the-scenes learning: even if your hands don’t finish every step by the end, you may still get to watch how the workshop completes production steps. That way, you understand what turns a partly completed item into the finished look.
Cost check: why $33 can be good value for a silver workshop
At $33, this isn’t a “cheap craft” and it isn’t a “luxury workshop” either. It sits in the middle, and you get what you need to make the experience worth the price.
Here’s what you’re paying for, in practical terms:
- You get silver (the material)
- You get tools (the equipment)
- You get instruction with English expertise
- You get a snack and mineral water
- You leave with the piece you made and a course certificate
If you’re comparing it to buying a silver souvenir in Yogyakarta, the workshop value is emotional and experiential. You get the story, the skill, and the satisfaction of wearing something you created. And because the workshop supplies the basics, you’re not stuck with hidden add-on costs for materials.
Also, the operator offers easy flexibility features like free cancellation up to 24 hours in advance and a reserve now & pay later option. That’s useful if your sightseeing schedule is still in flux and you’re trying to fit Kota gede craft time around temple visits and markets.
Who should book this Yogyakarta silver jewelry workshop?
This workshop is a strong fit if you want a hands-on craft activity that doesn’t require prior experience. You’ll be guided through the key steps, and the pace is designed for beginners who want to leave with a wearable result.
You’ll probably enjoy it most if:
- You like making things with your hands
- You want an activity with a clear start-to-finish outcome
- You prefer English instruction so you can follow tool and technique guidance
- You’re looking for a meaningful souvenir that feels personal
You might want to think twice if:
- You’re sensitive to working with sharp tools and metalworking equipment
- You need a workshop that accommodates more limited mobility needs
- You’re the kind of person who always wants to fully finish every detail yourself in the allotted time
If you’re uncertain, ask yourself honestly: do you want the learning experience more than the perfect completion? In a two-hour class, that mindset makes the workshop feel rewarding instead of stressful.
Should you book this Yogyakarta silver workshop?
If your goal is to make a silver jewelry keepsake in Kotagede with English instruction, included materials, and a guided process from soldering to detailing, I think it’s worth booking. The price-to-inclusions ratio is solid, and the chance to watch parts of the shop workflow adds real context beyond the bench work.
Book it especially if you want a hands-on cultural skill and you’d rather learn how things are made than just buy a finished item. Just go in with one realistic expectation: two hours is short, and your design choice affects how much you can personally complete.
FAQ
How long is the Yogyakarta silver jewelry making workshop?
The workshop duration is 2 hours.
What does the price include?
It includes a silver course certificate, your own masterpiece, snack, mineral water, silver, tools, and a silversmith guide.
Is the workshop taught in English?
Yes, the instructor is listed as English.
Where is the meeting point?
The meeting point is Jl. Mondorakan No.1, Prenggan, Kec. Kotagede, Kota Yogyakarta, Daerah Istimewa Yogyakarta 55172.
Do I need to bring tools or silver?
No. The workshop provides the silver and tools, along with the rest of the materials needed for the class.
What should I wear?
Wear comfortable shoes and comfortable clothes.
Is it wheelchair accessible, and is it suitable for mobility impairments?
The venue is listed as wheelchair accessible, but the activity is listed as not suitable for people with mobility impairments.
Are there any rules about fire or explosives?
Yes. Fireworks, explosive substances, and making fire are not allowed.